Host on GitHub Pages
Prerequisites
- Create a GitHub account
- Install Git
- Create a Hugo site and test it locally with
hugo server.
Types of sites
There are three types of GitHub Pages sites: project, user, and organization. Project sites are connected to a specific project hosted on GitHub. User and organization sites are connected to a specific account on GitHub.com.
Procedure
- Step 1
- Create a GitHub repository.
- Step 2
- Push your local repository to GitHub.
- Step 3
- Visit your GitHub repository. From the main menu choose Settings > Pages. In the center of your screen you will see this:
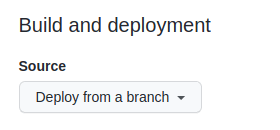
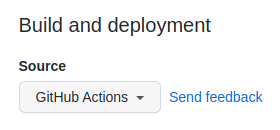
- Step 4
- Change the Source to
GitHub Actions. The change is immediate; you do not have to press a Save button.
- Step 5
- Create an empty file in your local repository.
.github/workflows/hugo.yaml
- Step 6
- Copy and paste the YAML below into the file you created. Change the branch name and Hugo version as needed.
.github/workflows/hugo.yaml
# Sample workflow for building and deploying a Hugo site to GitHub Pages
name: Deploy Hugo site to Pages

on:
  # Runs on pushes targeting the default branch
  push:
    branches:
      - main

  # Allows you to run this workflow manually from the Actions tab
  workflow_dispatch:

# Sets permissions of the GITHUB_TOKEN to allow deployment to GitHub Pages
permissions:
  contents: read
  pages: write
  id-token: write

# Allow only one concurrent deployment, skipping runs queued between the run in-progress and latest queued.
# However, do NOT cancel in-progress runs as we want to allow these production deployments to complete.
concurrency:
  group: "pages"
  cancel-in-progress: false

# Default to bash
defaults:
  run:
    shell: bash

jobs:
  # Build job
  build:
    runs-on: ubuntu-latest
    env:
      HUGO_VERSION: 0.126.0
    steps:
      - name: Install Hugo CLI
        run: |
          wget -O ${{ runner.temp }}/hugo.deb https://github.com/gohugoio/hugo/releases/download/v${HUGO_VERSION}/hugo_extended_${HUGO_VERSION}_linux-amd64.deb \
          && sudo dpkg -i ${{ runner.temp }}/hugo.deb
      - name: Install Dart Sass
        run: sudo snap install dart-sass
      - name: Checkout
        uses: actions/checkout@v4
        with:
          submodules: recursive
          fetch-depth: 0
      - name: Setup Pages
        id: pages
        uses: actions/configure-pages@v4
      - name: Install Node.js dependencies
        run: "[[ -f package-lock.json || -f npm-shrinkwrap.json ]] && npm ci || true"
      - name: Build with Hugo
        env:
          # For maximum backward compatibility with Hugo modules
          HUGO_ENVIRONMENT: production
          HUGO_ENV: production
          TZ: America/Los_Angeles
        run: |
          hugo \
            --gc \
            --minify \
            --baseURL "${{ steps.pages.outputs.base_url }}/"
      - name: Upload artifact
        uses: actions/upload-pages-artifact@v3
        with:
          path: ./public

  # Deployment job
  deploy:
    environment:
      name: github-pages
      url: ${{ steps.deployment.outputs.page_url }}
    runs-on: ubuntu-latest
    needs: build
    steps:
      - name: Deploy to GitHub Pages
        id: deployment
uses: actions/deploy-pages@v4- Step 7
- Commit the change to your local repository with a commit message of something like “Add workflow”, and push to GitHub.
- Step 8
- From GitHub’s main menu, choose Actions. You will see something like this:
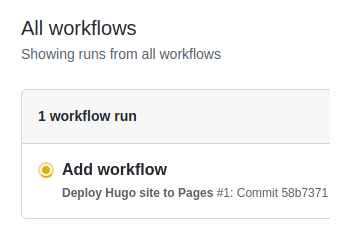
- Step 9
- When GitHub has finished building and deploying your site, the color of the status indicator will change to green.

- Step 10
- Click on the commit message as shown above. You will see this:
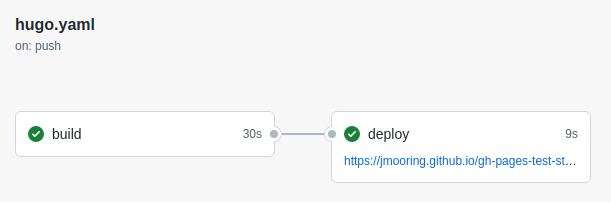
Under the deploy step, you will see a link to your live site.
In the future, whenever you push a change from your local repository, GitHub will rebuild your site and deploy the changes.
Customize the workflow
The example workflow above includes this step, which typically takes 10‑15 seconds:
- name: Install Dart Sass
  run: sudo snap install dart-sass
You may remove this step if your site, themes, and modules do not transpile Sass to CSS using the Dart Sass transpiler.